Table of Contents
Form Usage
This chapter describes basic iDocs concepts you should know before scanning, importing or designing a new form. It includes the following sections:
- Using Form Assistant
- Form Usage Options
- International Settings
Using Form Assistant
Form Assistant is a dialog box that appears when launching iDocs. If you are new to iDocs, you might prefer to use the Form Assistant, which makes decision-making easy when processing a form. Later, you might choose to use the commands in the design toolbar or menu. See “iDocs Procedures,” for more information about using the commands.
This section contains the following topics:
- Opening Form Assistant
- Form Assistant Options
Opening Form Assistant
There are several ways to open Form Assistant.
- Form Assistant opens automatically the first time you open iDocs.
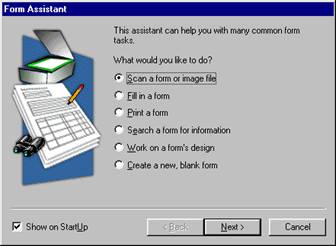
The Form Assistant dialog box contains six options for basic iDocs procedures as described in the next section. You can also select or deselect the option Show on StartUp, which determines whether the Form Assistant dialog box appears on startup.
Form Assistant Options
This section gives a brief description of each option in Form Assistant. Through a series of dialog boxes, Form Assistant easily steps you through the process of converting your form into an electronic form.
Scan a Form or Image File
Select Scan a form or image file to scan a paper form or import an image file and to determine how you will work with the form in iDocs.
Fill in a Form
Select Fill in a form to fill the currently open form or to open a form and fill it. See “Filling a Form,” for more information.
Print a Form
Select Print a form to print the currently open form or to open a form and print it.
Search a Form for Information
Select Search a form for information to search the currently open form for information or to open a form and search it.
Work on a Form’s Design
Select Work on a form’s design to redesign the currently open form or to open a form in design view. See “Designing a Form,” for more information.
Create a New, Blank Form
Select Create a new, blank form to open a blank page in design view.
Form Usage Options
Form usage affects the way you can use a form once it is in iDocs. This section contains the following topics:
- Choosing a Form Usage Option
- Where to Select Form Usage Options
- Changing Form Usage
Decide how you will use a form in iDocs before you scan or import it: as a designed form, as an original form, or as a nondesigned form image as described below.
Choosing a Form Usage Option
The following table provides the three usage options — designed, original, and nondesigned form — and recommendations for your choice.
| Choose Designed Form when you want: | Choose Original Form when you want: | Choose Nondesigned Form when you want: |
|---|---|---|
| full control over a form’s design | partial control over a form’s design | to input a form of such poor quality that it would cause recognition problems |
| to edit all form elements in design view | to maintain a form’s origi¬nal look | to draw new fillable objects on the form in design view |
| to create new objects in design view | to create new fillable objects on the form in design view | print or mail the form only |
| to fill fields in fill view | to fill fields in fill view | |
Where to Select Form Usage Options
Different form usage options are available depending on whether you open Form Assistant or choose Scan Form… in the File menu.
Form Assistant
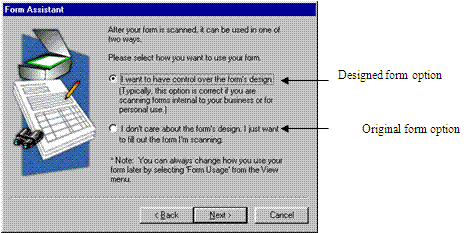
You can choose to scan in or import either a designed form or an original form in Form Assistant.
This dialog box is one of several in Form Assistant and appears during the scanning or import process. See “Form Assistant Options” for more information.
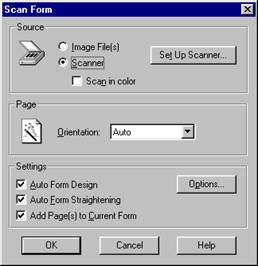
Scan Form Dialog Box
You can choose to scan in or import either a designed form or a non-designed form in the Scan Form dialog box after choosing Scan Form… in the File menu.
Changing Form Usage
Choose Form Usage… in the View menu to change the way you can use a form. For example:
- If you have an original form but decide to change the design, then you would change the form to a designed form.
- If you have a designed form that you have edited but want to mail the original form to someone, then you would change the form to an original form.
To change form usage:
- Choose Form Usage…in the View menu.
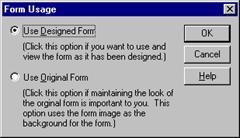
- The Form Usage dialog box appears.
- Select a form usage option.
- Select Use Designed Form to view the form as it was designed by iDocs on import along with any changes you have made to the form’s design.
You can edit all text and fields, and add graphics to the form. - Select Use Original Form to view the form as it looked originally, before you scanned or imported it to iDocs. You can create, resize, move, delete, define, or change the appearance of the spool data mapping or fillable fields with this option. Changes you make to text, graphics, and nonfillable objects are not visible until you select Use Designed Form.
- Click OK.
Your form changes to reflect the selected option.
You can change the form usage from a non-designed form to a designed form. However, the form will be blank except for any fillable objects you may have added.
International Settings.
iDocs supports different language and cultural conventions. You can choose from 45 different locales in the International tab in the Options dialog box. A locale — as defined for iDocs usage — is a combination of a language and a region. The language you select for a particular region affects how your form displays currency, numbers, and dates.
To Select a Language for Your Form:
- Choose Options… in the Tools menu.
- Click the International tab.
Two options are Current Form and New Forms.
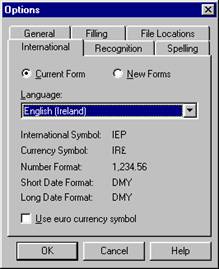
- Click Current Form.
The Language drop-down list displays the language being used for the currently open form. If you have the International English, French, or German versions of iDocs or if you have multiple dictionaries, a dictionary in this language will also be used during a spell check.
- Select a language for the current form.
- Click New Forms.
The Language drop-down list displays the default language that will be used for the next form you open, scan, or import.
The language selected for a new form will also become the Current Form selection when that form opens in iDocs.
- Select a language for new forms.
- Click OK.
How iDocs Uses Language Selections
Control Panel Selections
Selections made in the International tab do not affect selections made in the Regional Settings control panel.
Only the List Separator option in these control panels affects how data is displayed in iDocs.
The Options Dialog Box Readouts
Below the Language selection, iDocs displays readouts: the international symbol for the selected language (which appears in the status bar); and currency, number, and date conventions specific to that language The readouts show:
- How iDocs expects data to be entered in fill view.
- How iDocs will format data in fill view if it is not entered correctly. (Formatting takes place after you move the cursor out of a field.) See the next section for formatting examples.
Formatting Examples
Currency
If you select German (Austrian) as the Current Form language, the numbers 123456 entered in an appropriately defined currency field would display as öS 1.234,56.
If you select German (Liechtenstein) as the Current Form language, the numbers would display as CHF 1’234.56. Date
If you select English (United States) as the Current Form language, the date 2/ 5/96 entered in an appropriately defined date field would display as February 5, 1996.
If you select German (Standard) as the Current Form language, the date would display as 2. Mai 1996.
Euro Currency Symbol
Select the Use euro currency symbol to format currency fields with the euro currency symbol. You can use this feature if your system supports the euro currency symbol, that is, it can be entered via the keyboard, displayed on your screen, and printed.
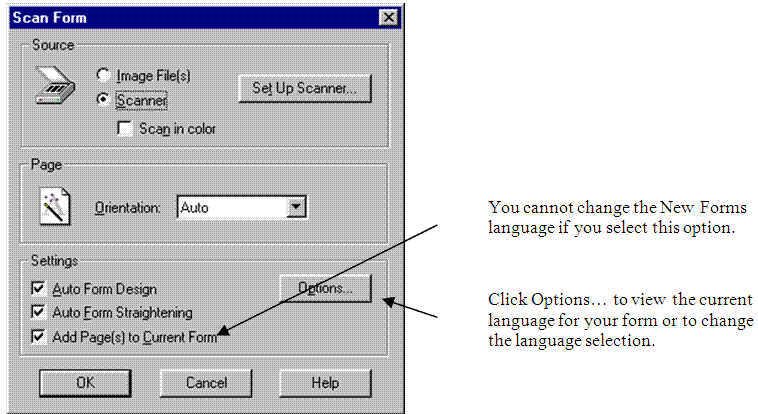
The Scan Form Dialog Box
The New Form language selection appears in the Options dialog box, which is selected from the Scan Form dialog box.
- Click Options… to view the language of your current form and to change the language for your new form.
You cannot change the New Form language selection if Add Page(s) to Current Form is checked because a language is already associated with the current form. A form can have only one language. - If you select Add Page(s) to Current Form, the Language display changes to reflect the Current Form language if it is different.
The Object Definition Dialog Box Options
The Current Form language selection affects available formatting options for fillable objects defined as Number, Date, or Currency in the Object Definition dialog box. For example, the long-date format for English (United States) is MMMM dd, yyyy. The long-date format for German (Standard) is d.MMMM yyyy.
The Allow Multiple Languages Option
How it Works
You can select Allow Multiple Languages in the Scan Form dialog box (by first clicking Options… in this dialog box and then selecting the Recognition tab) for multiple-language forms. iDocs then recognizes all characters in all languages that it supports. The setting does not affect the language(s) selected for your form in the Options dialog box and vice versa.
When you select Allow Multiple Languages, iDocs turns off dictionaries during optical character recognition (OCR) so that all recognizable characters are allowed. If dictionaries were on, special characters such as umlauts might be discarded or questionable words in one language could be mistaken for words in another language.
Do not select Allow Multiple Languages for a single-language form. OCR may not be as efficient with dictionaries turned off.
Selecting the New Forms Language
Determine which language composes the majority of your form and select that as the New Forms language before scanning. To do so, click Options… in the Scan Form dialog box.

