Table of Contents
[ Up To Index ]
iView 8 Setup
iView version 8 is significantly different than it's previous versions offering many enhancements.
Installation and Configuration
iView is comprised of two parts: The iView front end running on Tomcat Server (version 5.x or above), and the back end running on the IBMi (V6R1 or above).
Front end - Apache Tomcat
Download iView WAR file
The iView front end is typically provided in a war file. Download this file to your home directory in the IFS using binary file transfer, and then execute these commands ( populating the names with those used in your installation ). The directory /home/user is meant to refer to your user profile's home directory
Download Tomcat distribution file
Download Tomcat 6.x from FTP site at:
ftp://ftp.informdecisions.com/iView/apache-tomcat-6.0.39.zip
and upload this file to /home/user directory
call qp2term
cd /www
ajar -x /home/download/apache-tomcat-6.0.39.zip
Add environment variable JAVA_HOME at system level
Set JAVA_HOME environment variable: go to directory /qibm/ProdData/Java400 and choose a JDK version that you want to set for JAVA_HOME, then type command:
ADDENVVAR ENVVAR(JAVA_HOME) VALUE(/qopensys/QIBM/ProdData/JavaVM/xyz) LEVEL(*SYS)With xyz is the JDK folder of the version you want to set.
ADDENVVAR ENVVAR(JAVA_OPTS) VALUE('-Dos400.awt.native=true -Djava.awt.headless=true -Dserver
-Xms1536m -Xmx3072m -XX:NewSize=256m -XX:MaxNewSize=1024m -XX:PermSize=256m -XX:MaxPermSize=1024m') LEVEL(*SYS)
Verify the availability of the ports used by Tomcat
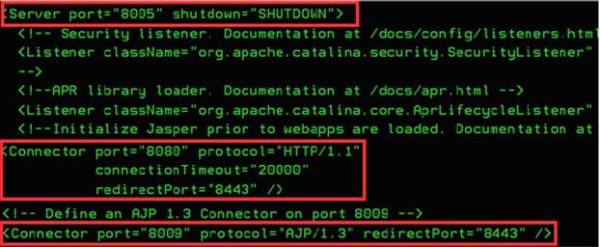
Tomcat uses 8005, 8080, and 8009 by default among which 8080 is the default HTTP port. Enter the command NETSTATOPTION(*CNN) to verify whether the ports are in use. If port 8009 and 8080 are occupied, edit the configuration file /www/apache-tomcat-6.0.39/conf/server.xml to change default ports 8005, 8009, and 8080 to other ports which are not in used. If you have multiple Tomcat servers running on this IBM i, you will need to use different ports for these values.

Change security for Tomcat folder
Type command:
CHGAUT OBJ('/www/apache-tomcat-6.0.39') USER(*PUBLIC) DTAAUT(*RWX) OBJAUT(*ALL) SUBTREE(*ALL)
Root userID and Password:
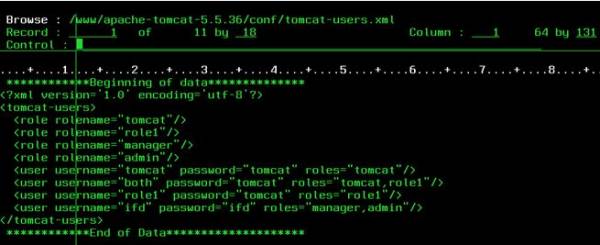
Go to /www/apache-tomcat-6.0.39/conf/tomcat-users.xml
And add:
<role rolename=“admin”/>
<user username=“<your_user_name>” password=“<your_password>” roles=“manager,admin”/>

Start Tomcat
Tomcat is installed and configured successfully. Now you can start Tomcat by using command: (Where the job queue is where you want to run Tomcat)
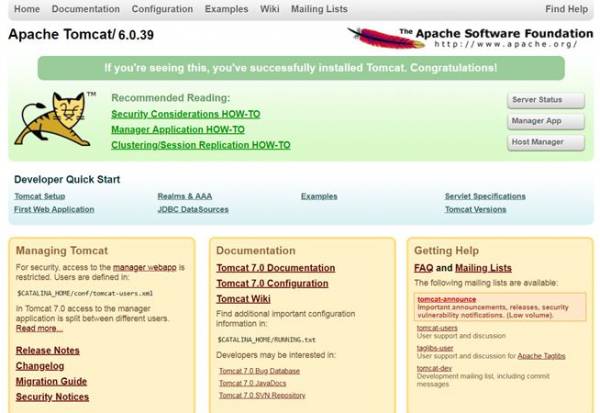
STRTOMCAT JOBQ(FMGJOBQ)To open your web browser, enter the URL http://your.server.name:8080

Stop Tomcat
Use command ENDTOMCAT to stop Tomcat
Back end - IBMi
The iView back end is typically provided in a savefile. To install, upload the savefile to the IBM i and restore it with a command like this ( you will need to populate this command with the names you are using on your system ):
RSTLIB SAVLIB(IVIEW844) DEV(*SAVF) SAVF(QGPL/IVIEW844) MBROPT(*ALL) ALWOBJDIF(*ALL)
Add the iView library to the top of the library list and execute GO IVIEW.
 IVIEW                    iView Version 8.44 02.20.18
                                                             System:   DEVV6CLT
   iView Archive Applications
      1. Work with iView Applications                        WRKIVWAPP
      2. Work with iView Processing Log                      CALL IVRELOG

   iView Server
     10. Work with iView Servers                             WRKIVWSRV

   Administrative Options
     20. Work with Administrative Menu                       GO IVIEWADM

                                                                         Bottom
 Selection


 F1=Help   F3=Exit   F12=Cancel
Enter License Keys and Set Location
Take option 20, then press Enter to enter the permanent or temporary license provided by your account manager. iView should have 3 key components: IVIEWWEB, IVIEW1, IVIEW2. Once entered, iView is now ready to use.
  8/30/18                      inFORM Decisions                       FM0070R1
 14:02:21                   iDocs Installation Library Set            KKRAMER

 System Information
    Serial Number:  102A36R       LPAR: 2     OS/400 Release: V6R1M0

 iDocs Production Information
    Product version . . . . . :
    iDocs Installation Library: FMG       Name, F4 for list

 Location settings
    Country Code . . . . . . .: US
    Code Page. . . . . . . . .:    37  1-65535


 Press enter to continue
 F3=Exit   F4=Prompt   F12=Cancel
Press <Enter> and then F6 to add the 3 iView License keys:
  8/30/18                       inFORM Decisions                      IMREGPS2
 14:06:42                  Module Registration Screen                 KKRAMER


 Module Name. . .

 Registration Code

 Status . . . . .  No license found for


  F3=Exit   F10=Update   F12=Previous
Then use option 8 to set the iView location and path. Set the parameters as appropriate to your installation or upgrade and press <enter> to update. These values are stored in the data areas DSIVIEWLIB (for iView Library) and DSIVIEWDIR (for iView IFS Path).
                   Change iView Library & IFS Dir (CHGIVWLIB)

 Type choices, press Enter.

 iView Library  . . . . . . . . .   *SAME         Character value
 iView IFS path . . . . . . . . .   *SAME


                                                                         Bottom
 F3=Exit   F4=Prompt   F5=Refresh   F12=Cancel   F13=How to use this display
 F24=More keys
Migrating Any Meta Data Files
If this is an upgrade, you can migrate the meta data files, configuration and license keys with the command IVCOPYDATA.
                          iView Copy Data (IVCOPYDATA)

 Type choices, press Enter.

 Current iView Library  . . . . .   iviewold      Character value
 New iView Library  . . . . . . .   iview         Character value
 Action on Metadata Files . . . .   *copy         *MOVE, *COPY, *NONE


                                                                         Bottom
 F3=Exit   F4=Prompt   F5=Refresh   F12=Cancel   F13=How to use this display
 F24=More keys
The use of *MOVE rather than *COPY for the meta data files may be appropriate if the meta data files are large. Note that the archived documents themselves, in the IFS, are not normally moved. You can copy them to a new location if you wished with the shell command cp -R. See system documentation regarding the use of that command.
[ Up To Index ]