Table of Contents
[ Up To Portal ]
Quick Start Guide for iDocs
Introduction
inFORM Decisions has provided this Quick Start Guide to present the step by step procedure, for iSeries electronic document composition, in order for you to understand, how to design and implement an electronic form, check or report application.
This Quick Start Guide will describe the standard merge and print operations with designer, iMap and iDocs print merge, and thus a simple overview of the setting up of a form applications.
The set up of a form application with design, mapping and merging is typically the very first step to implementing electronic document output and management. An electronic form application can range from a straightforward merging of data with a form overlay, to a very sophisticated application comprising of many different instructions and conditions to elegantly route and deliver intelligible information. Please refer to the iDocs User Guide for more advanced options and conditions, and for more information on how to define and route electronic forms.
There are three primary steps to setting up a Form Application (which could also be referred to as a Form “project”): 1. Designing the form 2. Mapping the spool data to the form 3. Integrating the Form into iDocs on the iSeries/System i
Lets begin.
Forms Design - Step 1
From iDocs version 4.0 and above, users can draw or compose a form overlay with most Windows compliant forms design softwares. Its important to note that the form design (overlay) should be as small a file size as possible, and therefore might not lend itself to many graphic programs on the market. At the date of this publication inFORM Decisions recommends their private labeled design software from ScanSoft, which can be purchased through inFORM Decisions, online, or many retail computer stores.
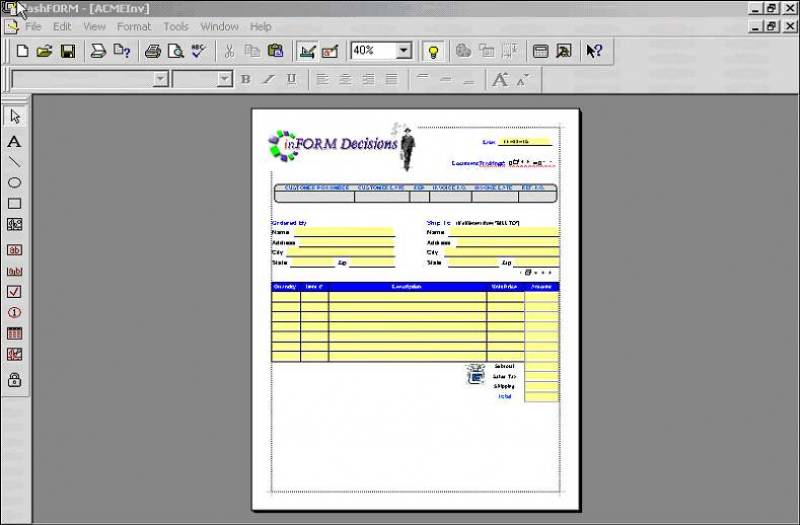
With inFORM’s Designer, the user is given a choice of tools to design a form, with labels, boxes, lines, etc.
To add new text to your form, select the Text button on the “docked” toolbar and click on the form where you want the desired text to appear. Type in the text and edit the font by right clicking on the text. Once the Text button has been selected, a selection of various fonts and font sizes becomes visible and available to the user.
To add a new line to your form, select the Line button on the “docked” toolbar and click on the form where you want the desired line to appear. Click and drag on the handles at the end of the line to adjust the length and orientation of the lines. Hold the shift key while dragging the handles change the line orientation in increments of 45 degrees. By pressing the shift key, the user can draw a perfectly straight vertical, horizontal and diagonal line.
To add an Oval object to your form, select the Oval object button on the “docked” toolbar and click on the form where you want the desired object to appear. To create variations of an oval or circle, click the left button of your mouse at the time of selection. To add a new Rectangle object to your form, select the Rectangle object button on the “docked” toolbar and click on the form where you want the desired object to appear. To create variations of a square or rectangle, hold down the left button of your mouse at the time of selection.
Use the Graphic tool to pull in graphics from your network, such as; logos, signatures (for iChecks users) or any other desired graphic to be imported into the form overlay. You can copy, import, or scan graphics into this object. One example of how this is useful, is when you want the same graphic (such as a company logo) to appear in every copy of the document. To add a new Graphic object to your form, select the Graphic object button on the “docked” toolbar and click on the form where you want the desired object to appear. Then, when the graphic definition window pops up, select the desired file from your PC or network.
Then, when the graphic definition window pops up, select the desired file from your PC or network.
Once you have finished designing your form overlay, as shown above, save it with an appropriate name. For example, ACMEINV to indicate an overlay for the Invoices of ACME company. Any name that directly relates to the application i.e. invoice, statement, check, etc. can be used.
Automatically convert existing scanned documents (“Picture”) into editable (“Vector”) forms… automatically !
One of the unique features of inFORM's Designer, is its ability to convert a scanned form into an editable form…automatically. This saves many hours of design time. inFORM Decisions is one of, if not the only, solution provider offering this powerful feature for iSeries/System i forms design.
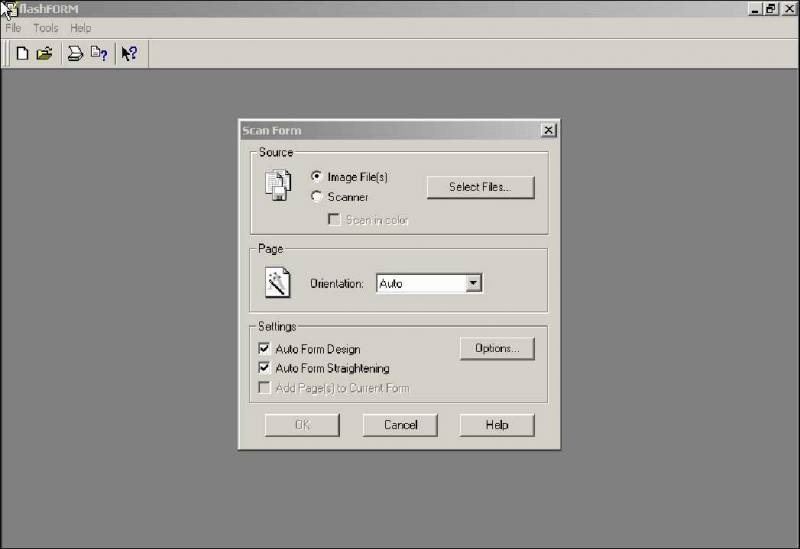
From the menu, click on File and choose Scan Form from the list. A window pops up for you to select the source of the image. In the Source section, click the Image File(s) radio button. Then click on the Select Files button to locate your previously scanned TIF image file. Keep the Page and Settings section defaults. Click on the OK button.
Click on the Select files tab, and select the file from the folder in which it is stored, click the Add File button to add the path to the Files and click OK to continue.
In the example below, the “Sample.tif “ file is selected.
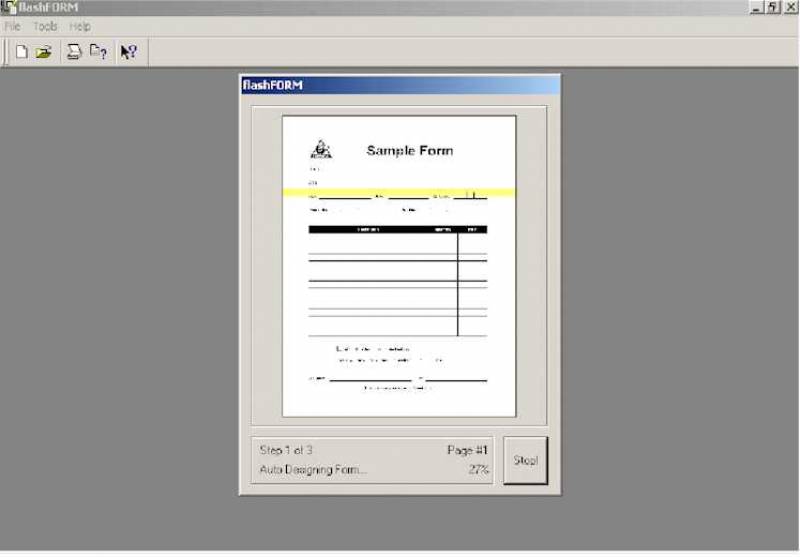
The Scan Form window will reappear. Click OK to start the automatic conversion of the form “picture” to “vectorized” lines, boxes, and text. It will also provide a “best guess” of every text, graphic, line and object. The screen display below shows the conversion in action. Once the auto-conversion and ‘vectorization’ has been completed, a fully editable, intelligent document will appear on the screen. At this time, you may save the file and begin mapping spool file data to it, or make any alterations or additions to the form overlay.
Map Spool Data - Step 2
iMap - inFORM's graphic spool data mapping utility - is one of the most powerfully unique tools available to import designed forms into the System i environment. iMap and iDocs driver install together with iMap software; users can print to the editable GUI mapping environment (iMap) from most any Windows design applications - including Word, PowerPoint, Adobe, Excel, and obviously inFORM's Forms Designer.
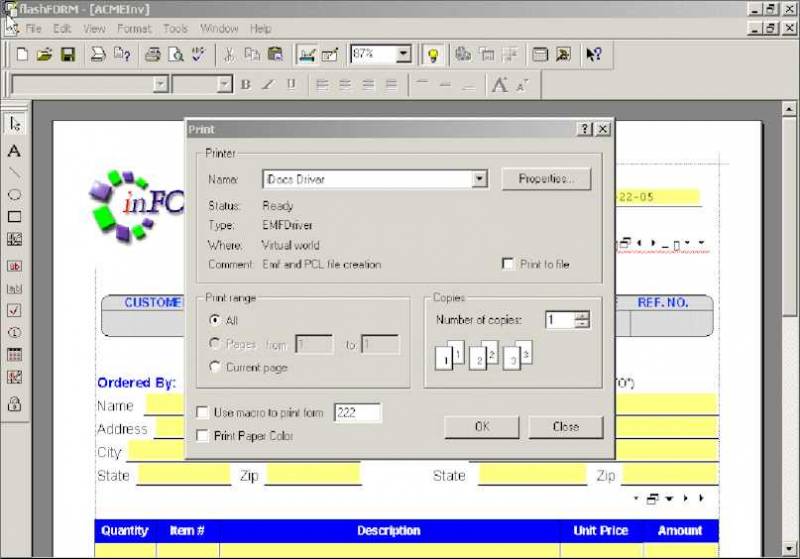
Once the form overlay is designed, send the file to the iDocs print driver to transfer the form into the graphical mapping environment – iMap.
To do this, select File, then Print from the Designer’s pull-down menu. Choose the iDocs Driver from the list of printer drivers available, and click ok.
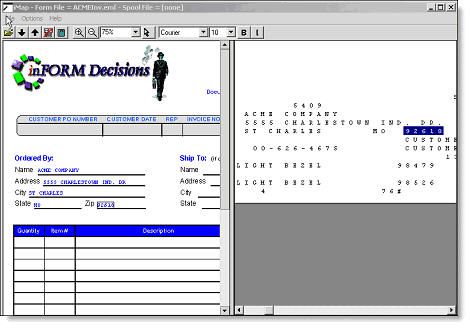
After selecting the iDocs Driver, this will spawn the iMap graphical mapping environment window. This will be a split screen (as shown in the next page) whereby the designed form is on the left hand side, and the right hand side is the pane into which the iSeries spool file will be downloaded.
Mapping Spool file data to the form overlay using iMap
We now need to specify where we want our data (data from an iSeries spooled file) to appear on the form overlay. With iDocs, there are two methods by which we can achieve this link: (1) using our Graphical User Interface (GUI) mapper iMap, and (2) Coordinate Mapping – green screen data mapping method. This Quick Start Guide will walk you through our most popular and elegant GUI mapping approach.
(See “Configure Data Map” in the iDocs User’s Guide for the green screen coordinate mapping option).
After iMap utility starts up, you will note the user-friendly split screen display interface allows you to view the spool file and the form overlay side-by-side.
Choose option Download Spool File from the File menu to download the spool file that you would like mapped to the form you have designed, or click on the DOWN ARROW. Once the spool file is downloaded it displays on the right side of the screen.
Mapping Fields: Specifying where the data from your spool file should appear on the form overlay is simple. Move the mouse across desired spool file data to highlight, then drag & drop the data into your form overlay. This will populate the area in which you want the data to appear on the form overlay.
Changing fonts: Once you have placed the data at the appropriate spots on the form overlay, you can change the fonts of these fields by right clicking on them and choosing Properties.
There are various functions and features that can be applied to the mapped text, which is discussed in the iDocs Users Guide.
Upload map file and designed form to the iSeries
Now, it‘s time to transfer the map file and the form overlay that we have just created, to the iSeries. To do this, choose option Upload Form Map from the File menu of iMap, or click on the Up Arrow. 
You will be presented with a sign-on window for the iSeries. Enter the IP address of the iSeries, and your iSeries user ID and Password, and click Connect.
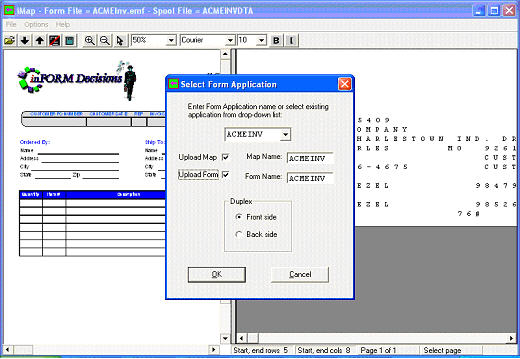
You will then be prompted to enter an application name or to select from a list of previously defined form application projects. This is the name under which all the work you have, and will do, to this Forms Application Project will be named as on the PC and on the iSeries host. Example; invoice, check, stmt, etc…
iMap gives the user the flexibility of just uploading the Data map or just the Form overlay or both. This can be used to print just the data without the form overlay (report formatting for example) or print just the form overlay without the data.
For this walkthrough exercise, select both the Upload Map & Upload Form boxes. Specify a name for the map file and a name for the form overlay, if you want the name different. Remember, these are the names by which the files will be saved and recognized on the iSeries.
Additional discussion of certain iMap tasks can be found here .
Finalize Form Application in iDocs - Step 3
At this point, the form overlay and the map files have been uploaded to the iSeries, and the PC based graphical work (project) has been saved on the PC. Next a Form Application has to be created on the iSeries.
Log in to the iSeries and add the FMG library to your library list by typing on the command line ADDLIBLE FMG pressing Enter.
Next display the iDocs main menu by typing GO IDOCS on the command line and pressing Enter to display the screen as shown below:
iDocs Main Menu
IDOCS                    iDocs Menu 4.02

  eDocument Management
     1. Work with Form Applications                         WRKIFDFRM
     2. Work with Check Applications                        WRKIFDCHK
     3. Work with Form Set Applications                     WRKIFDSET
     4. Work with Engines                                   WRKIFDENG
     5. iDocs Utilities                                     GO IFDUTILITY
     6. Work with Security                                  GO IFDSECURE

  eDocument Delivery
    10. iFax iSeries Native FAX                             GO FCMENU
    11. iMail iSeries Native email                          GO EMAIL
    12. iView PDF Document Center                           STRIVIEW

  ePayment
    20. Positive Pay - iSeries Native Check Security        GO IPAY
    21. iACH - ACH Electronic Payment                       GO IACH
                                                                        Bottom
Selection

F1=Help   F3=Exit   F12=Cancel
Choose Option 1 to Work with Forms and press Enter to display the screen on the next page
Selecting Form Application (project) to work with
                           iDocs Form Suite                         FM0465C1
3:14:58               Work with Form Applications                   DFORSTER

1=Edit            2=Configure datamap        3=Copy          4=Delete
7=Rename          8=Work with map fields    11=Conditional Text and Overlays
4=Smart Routing  15=Merge with Spool File   16=Print Overlays  17=Import Map

           Opt  Form        Description                Status
                 CGC151     CGC W2 FORMS (2005)        *CHECKIN
                 CGC152B    1099-B FORM FOR 2005       *CHECKIN
                 CGC152D    1099-DIV FORM FOR 2005     *CHECKIN
                 CGC152I    1099-I FORM FOR 2005       *CHECKIN
                 CGC152M    1099-MISC FOR 2005         *CHECKIN
                 W22005QTR  2005 W2 4UP QTR SHEET      *CHECKIN
            1   ACMEINV     Form created  with iMap    *CHECKIN
                AMERICOLD   Form created  with iMap    *CHECKIN
                BISHARA     Form created  with iMap    *CHECKIN
                CALLFRON    Form created  with iMap    *CHECKIN
                CDA         Form created  with iMap    *CHECKIN
                CHESAPEAKE  Form created  with iMap    *CHECKIN
                CITYPO      CITY OF BOULDER PO         *CHECKIN
                                                                      More...
3=Exit   F6=Add   F13=Database Mapping   F15=Global Offset   F21=System
The new or existing form application will be appear on the list, which is in alphabetical order. Enter the literal ‘1’ to select the form application that was uploaded and press enter, to display the Form Application Maintenance screen as shown in the next page.
Define a Form Application
 5/21/07                     iDocs Form Suite                        FM0465C3
23:18:46                Define a Form Application                    DFORSTER

Form  Application. . . . . .  ACMEINV   Form created  with iMap
Form  Size . . . . . . . . .      2                                     F4=List
Collate(Y/N). . . . . . . . . . . N     Use Mapped Fields Only (Y/N). . . Y
Orient (P)ortrait or (L)andscape. P     Pages per Overlay (1-9) . . . . . 1
Front Map File. :   ACMEINV     F4=List Back Map File . . :             F4=List
X adjustment value. . . . . . . .   0   Y adjustment value. . . . . . . .   0


Front Side                     Back Side               Form       Destination
Overlay   Seq  Drawer  Merge   Overlay           Merge Prompt     Out Queue
F4=List    #   F4=List Data    F4=List   Tumble  Data  F4=List    F4=List

ACMEINV     1      1     Y                         Y  *STD       HPWORKPTR


F1=Help  F2=Data Map   F3=Exit  F7=Footer      F8=Work with Mapped  Fields
F9=Advanced Functions  F12=Cancel   F15=Global Offset   F17=Import Map
When viewing your form application, note that most of the Form Application parameters have been defaulted.
Beneath the Overlay heading, you can press F4 to prompt for a list of form overlay files. The form overlay that we uploaded is already displayed. The file used in our Quick Start Guide is called ACMEINV
Leave the Backside section blank, unless you have a duplex printer and require some static information (Terms and Conditions for example) printed on the back. In this walkthrough we do not.
Leave the Form Prompt with *STD and Destination Out Queue line blank.
When completed, your screen should look like the one above. Press the Enter key twice (to confirm any changes) then press the F3 key to go back to the iDocs main menu.
Print your defined electronic form application
Use the manual operation to print your electronic form application for now, but note that the “Engine” may be the operational method to automate the document output/management process. There is also an API “Print Immediate” command to process the merges via a command embedded in the job stream. Refer to the iDocs Users Guide for information on the “Print Immediate” API command.
Manually Merge and output your Form Application
Select Option 15 from the Work with Form Applications Menu to Merge with Spool file and press the enter key.
  5/21/07                     iDocs Form Suite                        FM0465C1
 23:25:53               Work with Form Applications                   DFORSTER

  1=Edit            2=Configure datamap        3=Copy          4=Delete
  7=Rename          8=Work with map fields    11=Conditional Text and Overlays
 14=Smart Routing  15=Merge with Spool File   16=Print Overlays  17=Import Map

             Opt  Form        Description                Status
                  CGC151     CGC W2 FORMS (2005)        *CHECKIN
                  CGC152B    1099-B FORM FOR 2005       *CHECKIN
                  CGC152D    1099-DIV FORM FOR 2005     *CHECKIN
                  CGC152I    1099-I FORM FOR 2005       *CHECKIN
                  CGC152M    1099-MISC FOR 2005         *CHECKIN
                  W22005QTR  2005 W2 4UP QTR SHEET      *CHECKIN
              15  ACMEINV     Form created  with iMap    *CHECKIN
                  AMERICOLD   Form created  with iMap    *CHECKIN
                  BISHARA     Form created  with iMap    *CHECKIN
                  CALLFRON    Form created  with iMap    *CHECKIN
                  CDA         Form created  with iMap    *CHECKIN
                  CHESAPEAKE  Form created  with iMap    *CHECKIN
                  CITYPO      CITY OF BOULDER PO         *CHECKIN
                                                                        More...
 F3=Exit   F6=Add   F13=Database Mapping   F15=Global Offset   F21=System
 Access Check applications using option 2 from the main menu                  +
The ‘Work with Spooled Files’ screen will then appear as shown below.
 5/21/07                     iDocs Form Suite                        FM2000C3
23:28:38                    Work with Spooled Files                  DFORSTER
                            User:  *CURRENT

1=Merge/Print   2=Change     4=Delete      5=Display      7=Merge/Archive
8=Hold   9=Release  10=Email   11=Merge/Email   12=FAX   13=Merge/FAX
                                                               Total  Form
Opt File       Job        User       Outq       User Data  Sts Pages  Type
    FMGLASER   QPADEV0004 DFORSTER   IDOCSFAX   ACMEINVDTA HLD     1* HP121026
    FMGLASER   QPADEV0005 DFORSTER   IDOCSFAX   ACMEINVDTA HLD     1* HP210828
    FMGLASER   QPADEV0005 DFORSTER   IDOCSFAX   ACMEINVDTA HLD     1* HP210832
    QSYSPRT    QPADEV0004 DFORSTER   PRT01                 HLD     1  SP220910
    FMGLASER   QPADEV0004 DFORSTER   IDOCSFAX   ACMEINVDTA HLD     1* HP311226
    FMGLASER   QPADEV0004 DFORSTER   IDOCSFAX   ACMEINVDTA HLD     1* HP311303
    FMGLASER   QPADEV0004 DFORSTER   IDOCSFAX   ACMEINVDTA HLD     1* HP311424
    FMGLASER   QPADEV0004 DFORSTER   IDOCSFAX   ACMEINVDTA HLD     1* HP071128
    FMGLASER   QPADEV0004 DFORSTER   IDOCSFAX   ACMEINVDTA HLD     1* HP121459
 1  ACMEINVDTA QPRTJOB    DFORSTER   MDONCKELS  ACMEINVDTA SAV     1  SP290851
    FMGLASER   QPADEV0003 DFORSTER   IDOCSFAX   ACMEINVDTA HLD     1* HP111123
    FMGLASER   QPADEV0004 DFORSTER   IDOCSFAX   ACMEINVDTA HLD     1* HP191232
    FMGLASER   QPADEV0003 DFORSTER   IDOCSFAX   ACMEINVDTA HLD     1* HP090905
                                                                       More...
F3=Exit   F5=Output Queue   F12=Previous   F17=Top   F18=Bottom  F23=Options
Select the same spool file that was used for the mapping operation above and press the Enter key.
Another pop menu appears, as shown below, to prompt for Output Queue Options.
             Output options

        Outq: __HPWORKPTR__
        Start Page.:   __1__
        End Page...:   __1__
        Copies.....:   __1__
        Font:
        SplfName...:

        F8=Change Font   F12=Previous
Fill in the information as it appears below, only if you wish to change default values:
- Type the name of your Laser Printer Queue – name of laser printer outq
- Start Page 1 – user can select the starting page to print
- End Page 1–user can select the ending page to print (to define the range)
- Copies 1 – number of copies for this merged print job
- Font – can define a default font for the overlay data (usually leave blank)
- Splfname – user can define a new name for the merged job (default is FMGLASER)
Press the Enter key to continue the process. Your document(s) will now print to the designated laser printer.
[ Up To Portal ]
