[ Up To iMail ]
Create and format Excel Templates
General Note:
iDocs will use the Form Application to hold the instructions to follow to create the output as an Excel sheet which is formatted. There will be similarities to the structure of the Form Application. For the Front Side Overlay field we’ll use a Excel file (.XLS) instead of the Macro file (.MAC); for the Mapped Field we’ll use one of three different Map Types…
Map Type 8 = *XLS Header Field
Map Type 9 = *XLS Detail Field
Map Type 1 = *XLS Total (Footer) Field
The Map Field’s To/From Rows and Columns will select the data on the spool file which you want to use to appear on the Excel sheet.
The Map Fields will correspond to the Cell Location and Name on the Excel sheet which will be use as the overlay/template.
For example if you have Mapped Field side01001 on the Form Application and the Map Type is 8 as the header and you position the Map Field name in a cell location on the Excel sheet that is on top, the data will appear in that location in the cell. This will become easier to see as you setup your first Form Application.
Create and format the Excel sheet:
Open Excel and start to position your Map Field name in the location you want them to appear.
Note: You may find it easier to first map the field name on a Form Application so you know which fields will be header fields and which fields will be detail fields and to see the field names.
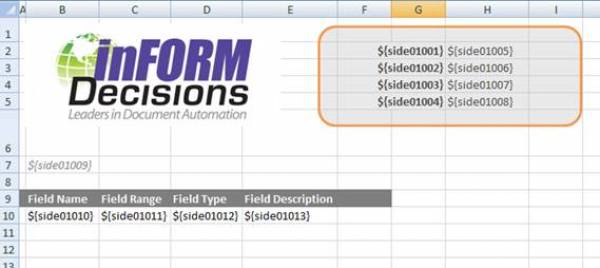
Here is a sample view of a formatted Excel sheet:

The syntax for assigning of the Field Name I ${xxxx} in which xxxx equals the name of the Mapped Field Name. For example if the Mapped Field Name is SIDE01001 then you will want to use ${side01001} in your Excel sheet.
Once you are done with configuring your excel sheet, you will want to save it as .XLS (not .XLSX). Keep the name to an 8 Alpha/Numeric name.
Then you can either use Navigator, Filezilla, FTP, or whatever method you want to use to move the newly created .XLS file to the FORMFMG folder under QDLS on the IBMi.
Setup the Form Application with Mapped Fields:
If you have not create a Form Application already, then at this time you will want to create a Form Application.
Helpful tip: You may want to use iMap to Map the spool file data, and then change the Map Type after you upload to iDocs on the IBMi.
Create the Form Application with the Mapped Fields using one of the three Map Types for *XLS.
Enter the newly created XLS name under the Front Side Overlay field.
Within the Form Application select option F6 = XLS Fnc to configure the following:
- IFS Output Folder: If you want to save the output to a directory fill this is with the directory path, otherwise leave blank
- XLS File Name: Fill in the name you want to call the XLS file.
- Spool Pages in separate sheets: Y/N Y=Yes, for separating into separate sheets within the workbook; N=No, too keep in one sheet.
- Overwrite = Y=Yes, for overwriting already exciting files with same name (mainly when saving to directory); N=No, for saving with an appending number.
F6 XLS Settings screen:
                      iDocs XLS Settings

  IFS Output Folder:  /idocs/xls

  XLS File Name. . :  ABC

  Spool pages in separate sheets:  Y Y/N
  Overwrite  . . . :  Y Y/N

  F3=Exit   F4=Prompt   F10=Save
Lastly, for the Destination Out Queue use *EMAILXLS to output as XLS when emailing out.
Testing with iMail when doing a manual merge… When testing, select the Form Application with 15 to merge with a spool file Then select the spool file with option 11 to merge and email When sending the email, change the TYPE field to *XLS to send out as an XLS format.
