Table of Contents
Using Calculations
This chapter describes how to use iDocs’s calculation features. iDocs automatically performs calculations when you fill in the appropriate fields.
Use calculations to automate data entry and prevent errors. For example, the average person might find it time-consuming to add a column of 100 numbers, and easy to make an error, but iDocs can return an error-free sum in a fraction of a second. All you have to do is define the calculation properly and iDocs does the rest of the work.
This chapter contains the following sections:
- Calculation Overview
- Operators
- Functions
Calculation Overview
This section gives an overview of how to create calculations. It contains the following topics:
- Creating a Calculation
- Calculation Guidelines
- Using the Recalculate… Command
- Usage Conventions
See the online tutorial for step-by-step instructions on creating a simple calculation.
Creating a Calculation
Calculations are created in design view. You can create a calculation for fill text, comb, check box, and circle text objects.
You must open the calculation toolbar to begin.
To open the calculation toolbar:
- Select a fill text, comb, check box, circle text, or table object in your form to activate the toolbar.
The calculation toolbar contains five buttons and a text box. - Calculation text box
The calculation for the selected field appears here. Click in the text box to edit a calculation manually. - Create a calculation in one of three ways:
- Use the Calculation Builder to define a calculation.
See “The Calculation Builder”. - Have iDocs define a calculation automatically.
See “Auto Calculations”. - Click in the calculation text box and type a calculation.Follow the guidelines in “ Calculation Guidelines”. See “Functions” examples.
You can also use the Calculation List dialog box to change your calculations.
The Calculation Builder
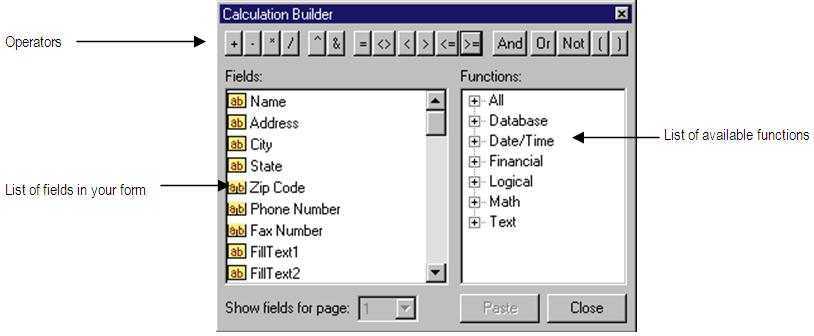
The Calculation Builder dialog box contains operators, a list of all the fields in your form, and functions for creating calculations.
To define a calculation with the Calculation Builder:
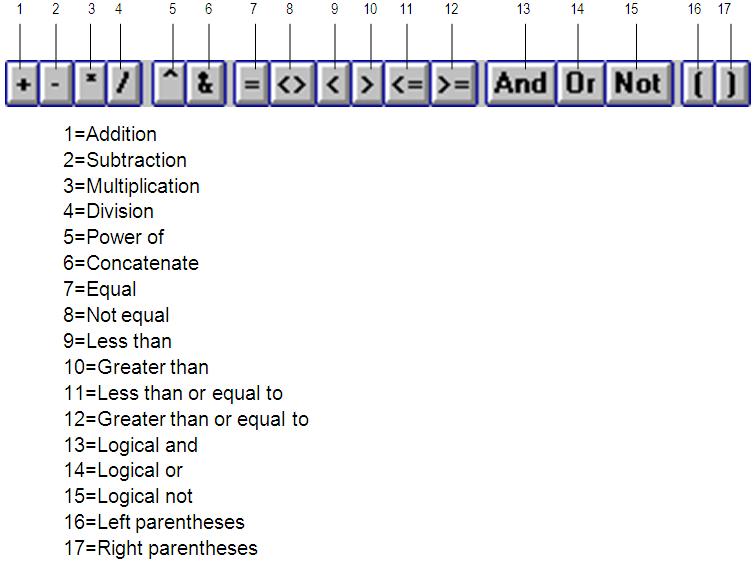
- Operator buttons
Each button represents an operator. Click a button to insert an operator in the calculation text box.
See “ Operators” for detailed information. - Fields list
This list contains all the available fields in your form. Double-click a field name in this list to place it in the calculation text box, or select it and click Paste.
Or, click any field in your form to insert its name in the calculation text box. This is useful if you have many fields listed or if they do not have unique names. You can also drag the cursor around multiple objects to insert each one. - Functions list
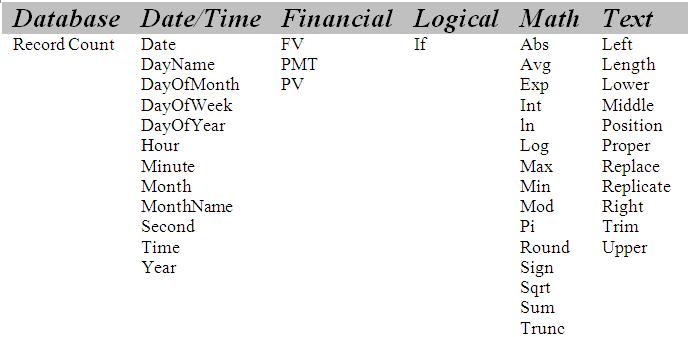
This list contains all available functions that can be used in a calculation. (Functions are sorted by category.
Click the plus sign in front of a category to open it.) Double-click a function to insert it in the calculation text box, or select it and click Paste.
See “ Functions” for detailed information.
- Select the operators, fields, and functions that you need for your calculation.
- A calculation is defined on the selected field when you click the Accept Calculation button. iDocs performs the calculation automatically in fill mode when the appropriate fields are filled.
- You can manually delete entries in the text box and click the Accept Calculation button if you want to clear the box entirely.
This is useful if clicking the Cancel Calculation button causes it to revert to a previously accepted version.
Suppose you wanted to create a calculation for a Subtotal field in an invoice. The Subtotal field is the sum of the Price1 and Price2 fields. There is often more than one way to create a calculation. Here are two calculations you could create:
- [Price1]+[Price2]
- Sum([Price1],[Price2])
Both calculations return the same result. The first calculation is simple addition. It is easy for new users to create.
The second calculation uses the Sum function and is more complex than the first calculation. This calculation is useful for adding multiple fields because you do not need to place the Addition operator between them.
iDocs automatically inserts the necessary parentheses, brackets, and commas when you create a calculation using the Calculation Builder. See “ Calculation Guidelines” .
Auto Calculations
To create an auto calculation, iDocs looks for such common field names as Quantity, Price, Total, and Sum. It also determines calculations based on field type, field names, and column header labels. If you selected a field named Total, for example, iDocs would look for fields above the Total field to sum.
This is one reason it is important for fields to have unique names. See “Defining Objects on a Form” for detailed information.
To create an auto calculation:
- Select a fill text, comb, check box, circle text, or table object in your form to activate the toolbar.
A calculation appears in the calculation text box if one was defined for this object before. If so, proceed to step 4. - If no calculation appears, click the Auto button in the calculation toolbar.
A message appears if an auto calculation could not be created. See “The Calculation Builder” if iDocs could not create a calculation and you want to create your own.
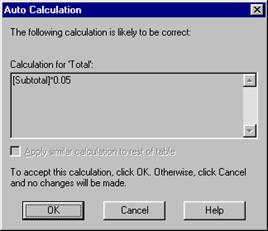
The Auto Calculation dialog box appears if iDocs proposes an auto calculation.
- Accept or cancel iDocs’s proposed calculation.
- Click OK to accept the calculation.
The calculation appears in the toolbar’s text box. - Click Cancel to close the dialog box without creating a calculation.
- Edit the calculation in the toolbar if necessary:
- Click in the calculation text box and make manual changes, or click the Calculation Builder button to open the Calculation Builder dialog box. See “ The Calculation Builder”.
 Click the Cancel Calculation button to close the Calculation Builder and revert to the version created by iDocs.
You can manually delete entries in the text box and click the Accept Calculation button to clear the box entirely. This is useful if clicking the Cancel Calculation button causes the calculation to revert to a previously accepted version.- Choose Calculation in the Tools menu to close the toolbar.
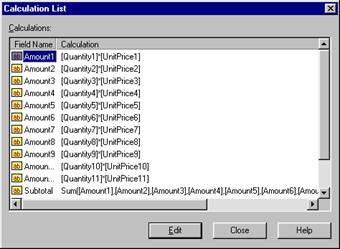
The Calculation List
The Calculation List dialog box lists all of your form’s calculations and allows you to make changes to the calculations.
To change your calculations:
- Double-click the Field Name that you want to change. Or, select the Field Name that you want to change and click Edit.
- The calculation that you want to change appears in the Calculation Edit text box.
Make any changes that you want.
Using the Recalculate... Command
Recalculating records applies any new or changed calculations to all selected records in a database. Until you use the Recalculate… command, new or changed calculations apply only to new records or to current records whose relevant field entries change.
See “ Recalculating Records” for detailed information.
Calculation Guidelines
Keep these guidelines in mind as you work with calculations:
- Brackets ( [] ) must enclose a field name that contains a space.
[Quantity Ordered] * [Unit Price]
iDocs will not accept the calculation otherwise. - Parentheses ( () ) must enclose an entire function.
Sum([Price1],[Price2])
This tells iDocs where the function begins and ends. You may have more than one function in a calculation. - You must insert a list separator between fields in a manually created function.
Sum([Price1],[Price2])
Use the list separator from the Windows Control Panel.
Use the List Separator selection in the Number tab of the Regional Settings control panel. - iDocs automatically inserts list separators, parentheses, and brackets when you use the Calculation Builder or the Auto button to create a calculation, and when you click the Accept Calculation button to accept a calculation.
See the previous bulleted item for an explanation of the list separator iDocs uses. - iDocs does not automatically insert brackets around a manually created field name that contains a space. You must insert brackets manually.
- If you manually enter a decimal number in a calculation, use the decimal selection from the Windows Control Panel.
Use the Decimal symbol selection from the Number tab of the Regional Settings control panel. - Quotes ( “ ” ) must enclose a text string.
If([Name1]=”Ann”,”Dear Ann:”,”Dear Customer:”) - iDocs automatically removes extra spaces (except a space in a field name) when it accepts a calculation.
You can insert spaces between operators and after commas when creating a calculation if this helps you to see it more clearly. - Calculations are performed in tabbing order.
- If a calculation contains another field that has a calculation, the other field’s calculation is performed first.
Usage Conventions
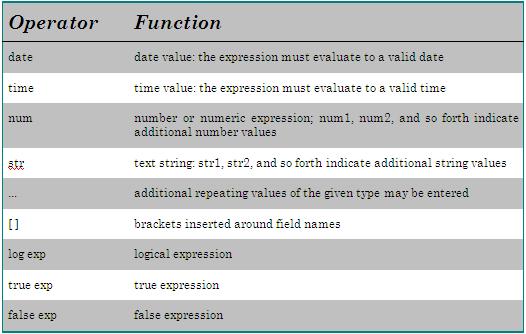
Substitute the appropriate field name where you see num and str in the function examples. Parentheses are required where indicated. Below is a list of conventions showing operator and function usage.
Operators
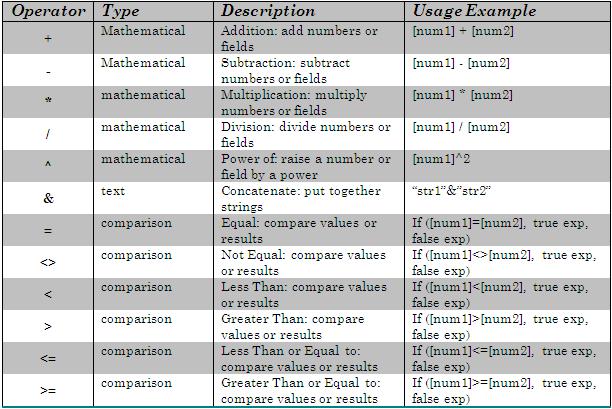
Operators represent mathematical, comparison, logical, and text operations to be performed within a calculation. You must have an operator between fields in a calculation.
For example, a calculation for a Total field might look like this:
[Price1] + [Price2] + [Price3]
The plus signs between the field names are the Addition operators in the calculation.
The calculation could also look like this:
Sum([Price1],[Price2],[Price3])
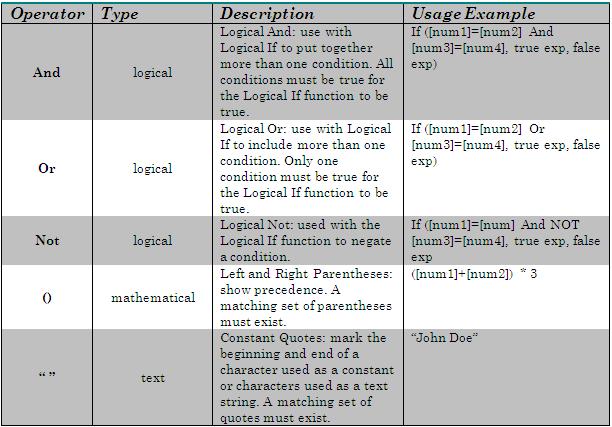
The parentheses are the operators in the calculation. Commas, although not operators, also separate the fields.
You must insert the proper parentheses, brackets, and commas when you create a function manually or iDocs will not accept the calculation. See “ Calculation Guidelines” for detailed information.
iDocs automatically inserts commas, parentheses, and brackets when you create a calculation with the Calculation Builder or the Auto button, and when you click the Accept Calculation button.
Operator Buttons
Operators — Quick Reference
Functions
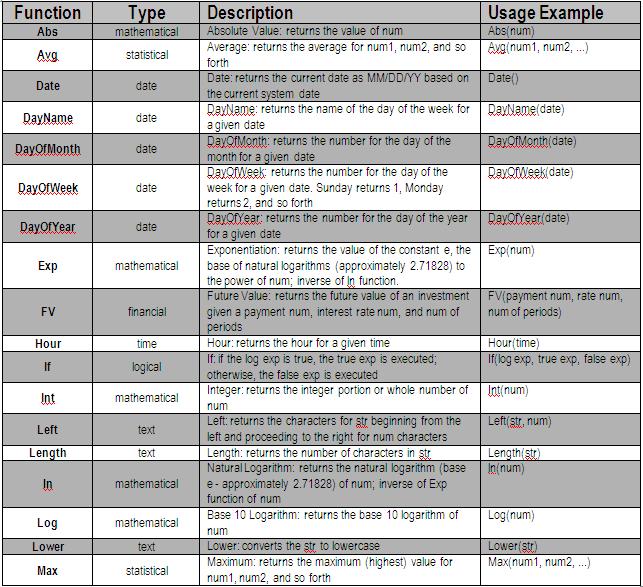
Functions are single words used by iDocs to represent operations within a calculation. Functions can use field values, information you enter, and information from outside sources such as the computer date.
Please refer to the online help for a definition of each function and instructions on how to use a function in a calculation.
See “Creating a Calculation” for instructions on creating calculations. See “Usage Conventions” for a list of the conventions used in this chapter.
The format of the values returned in the examples is dependent on:
- The Language selection in the International tab of the Options dialog box
- The Format selection in the Properties tab of the Object Definition dialog box for the selected object
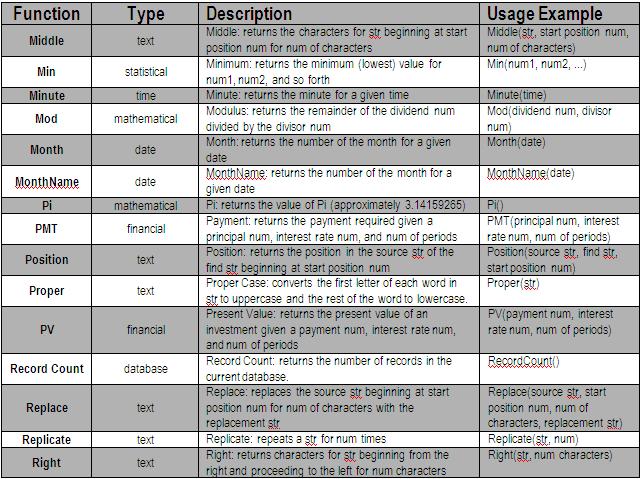
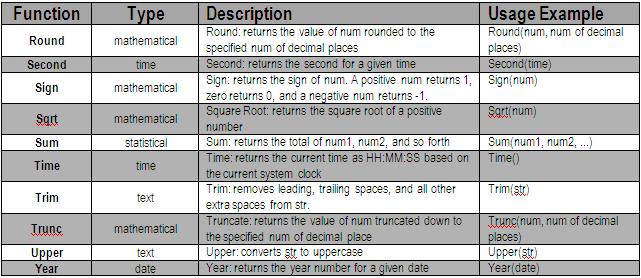
Functions — Quick Reference
See “Usage Conventions” for information on how to interpret the examples in the following table. Or, refer to online help for an example of each function. The following table lists a brief description and usage of each function.


